The standard and well-known method for user interaction with web-based applications involves the user entering information (e.g. filling out a form), submitting that information to the server, and awaiting a page refresh or redirect to return the response from the server.
This is at times frustrating for the user, besides being rather different to the 'desktop' style of user interface with which he may be more familiar.
Ajax (Asynchronous Javascript And XML) is a technique (or, more correctly, a combination of techniques) for submitting server requests 'in the background' and returning information from the server to the user without the necessity of waiting for a page load.
There are a few, relatively simple, steps to coding an Ajax application. The description below is an attempt to describe the main points without bogging down the new user in too many of the technicalities.
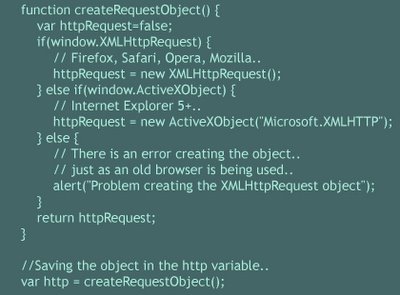
First, we need to know how to create an XMLHTTPRequest object. The process differs slightly depending on whether you are using Internet Explorer (5+) with ActiveX enabled, or a standards-compliant browser such as Mozilla Firefox.
 Second, we need to write an event handler which will be called via some event on our user's page, and will handle sending our request for data to our server.
The event handler will use various methods of our XMLHTTPRequest object to:
-- Make the request to the server..
-- Check when the server says that it has completed the request..
-- Deal with the information returned by the server..
We can make our request of the server by using a GET method to an appropriate server-side script. Here's an example event handler called sendRequest which assumes that we have created our XMLHTTPRequest object and called it http: Note that the function listens to the onreadystatechange property of the XMLHTTPRequest object and, each time this parameter changes, calls a further function handleResponse..
Third, then, we need to write a function handleResponse which will establish when the server has completed our request, and do something useful with the data it has returned: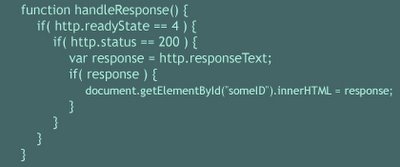 Note here that our function checks for a readyState value of 4 - there are various numbered states describing the progress of such a request, but we are only interested in the value of 4, which indicates that the request is complete and we can use the returned data.
Also we check that a successful server response was received.. that's 200..
In this case, we have received our information as simple text via the responseText property of our XMLHTTPRequest object. Information can, however, be returned as XML or as properties of a predefined javascript object, though this is perhaps beyond the scope of this tutorial.
This creates a request object along with a send request and handle response function. So to actually use it, you could include the previous JavaScript functions in your page. Then to make one of these backend requests you would tie it to something. Like an onclick event or a straight href like this: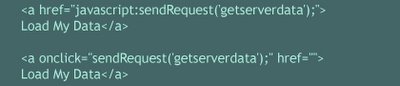 That means that when someone clicks on that link what actually happens is that a backend request to
( somepage.php?id=getserverdata ) will be sent.
Now, let's get to the server-side part "somepage.php", you might have something like this: Now, look at handleResponse. It assigns the string returned by the server "Hello AJAX World" to the ID named someID using DOM..
That means if you have a DIV tag like this in your page: Once you click on that link, that will dynamically be changed to:
 That's all there is to it. Everything else is just building on top of this. Replacing the simple response "Hello AJAX World" syntax with a richer XML format and making the request much more complicated as well. Before you blindly install large "AJAX" libraries, have a go at rolling your own functionality so you know exactly how it works and you only make it as complicated as you need. Often you don't need much more than what is shown here.
<.adjuster />
Thanx a lot !
ReplyDeleteYou welcome !
ReplyDelete